A canelé is a Saturday-afternoon project, maybe a Sunday. Not because it’s complicated — the batter takes ten minutes — but because it requires you to do nothing for a significant stretch of time, which is harder than it sounds. You mix, you wait, you bake, and then you wait again.
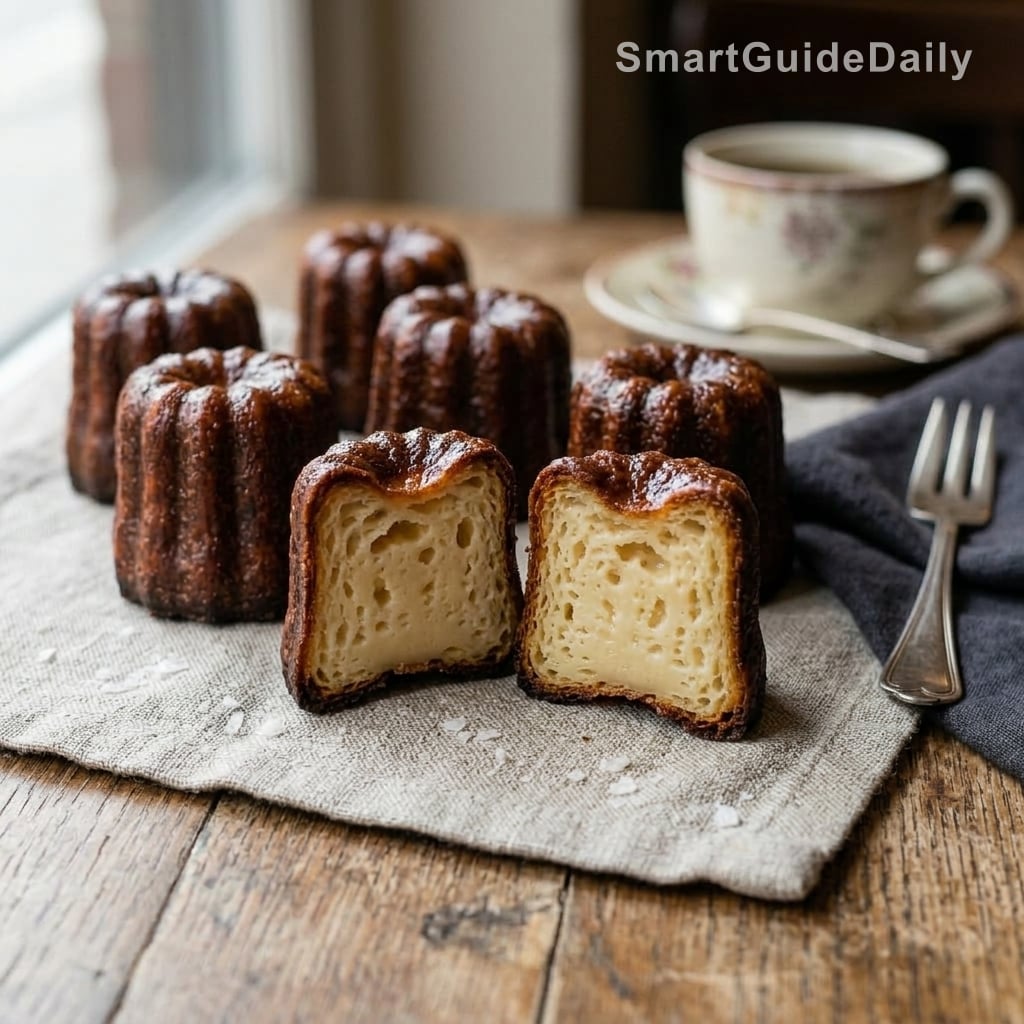
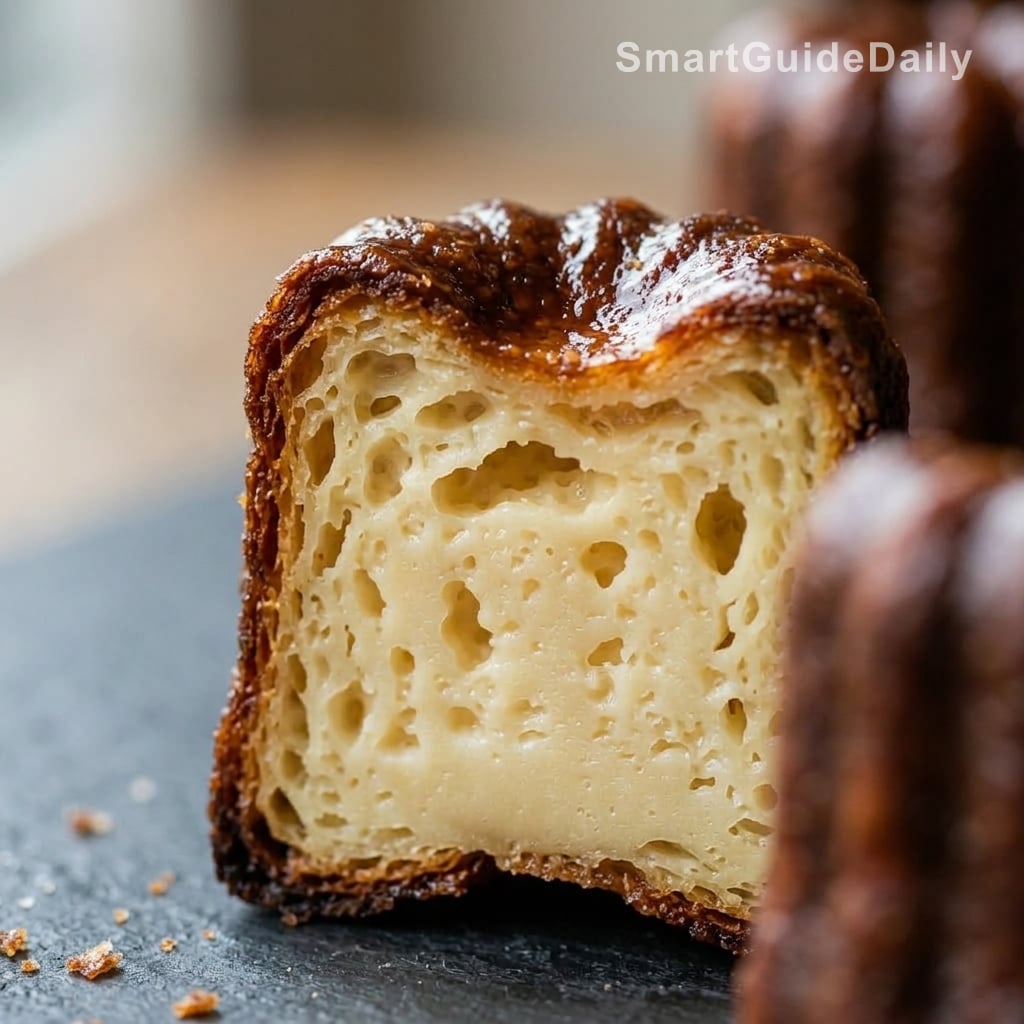
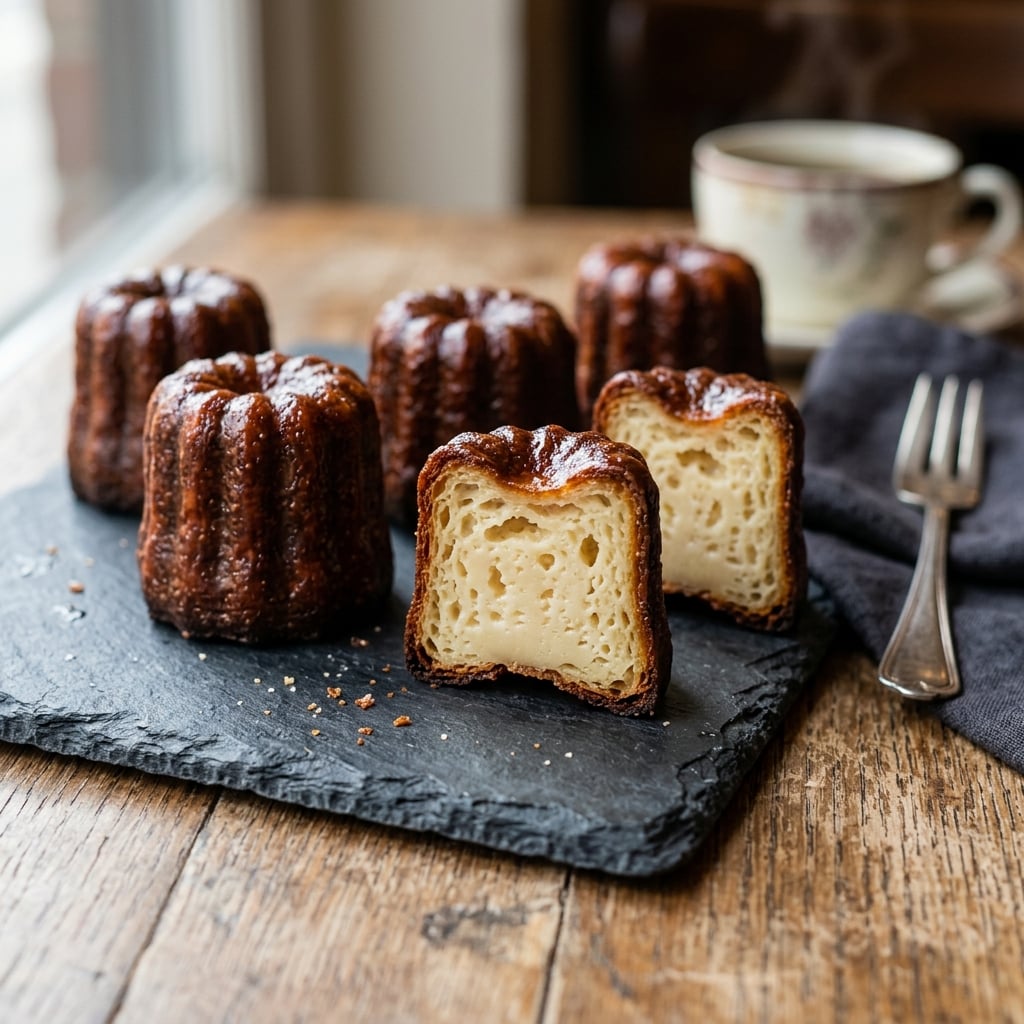
What comes out of the oven, if you’ve held your nerve, is a small cylinder with a crust so dark it looks almost burnt. The exterior is rigid, lacquered, with a faint caramel bitterness you can smell from across the kitchen. Cut it in half and the center is a different material entirely: pale, trembling slightly, custard-textured but set — somewhere between flan and a very dense pudding. The contrast is the whole point.
Why you’ll love this recipe
Ingredient Notes
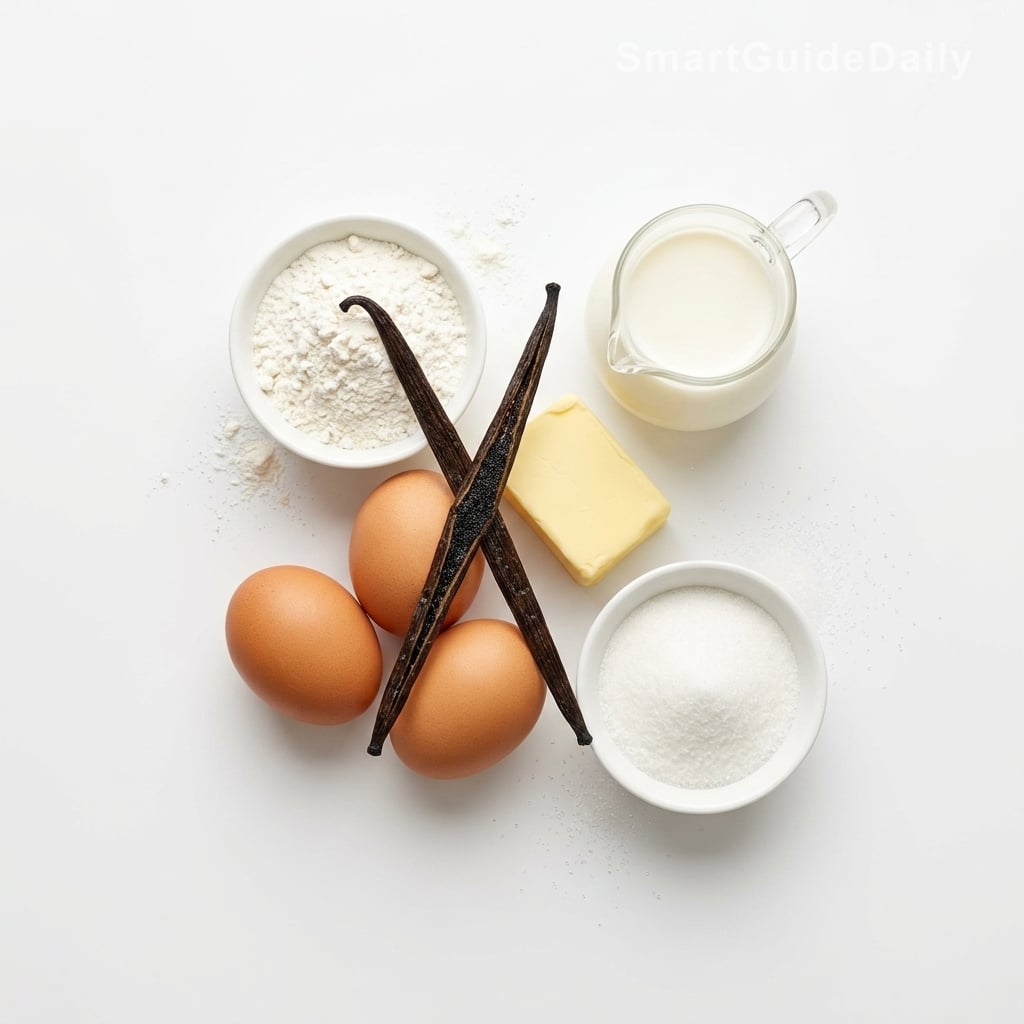
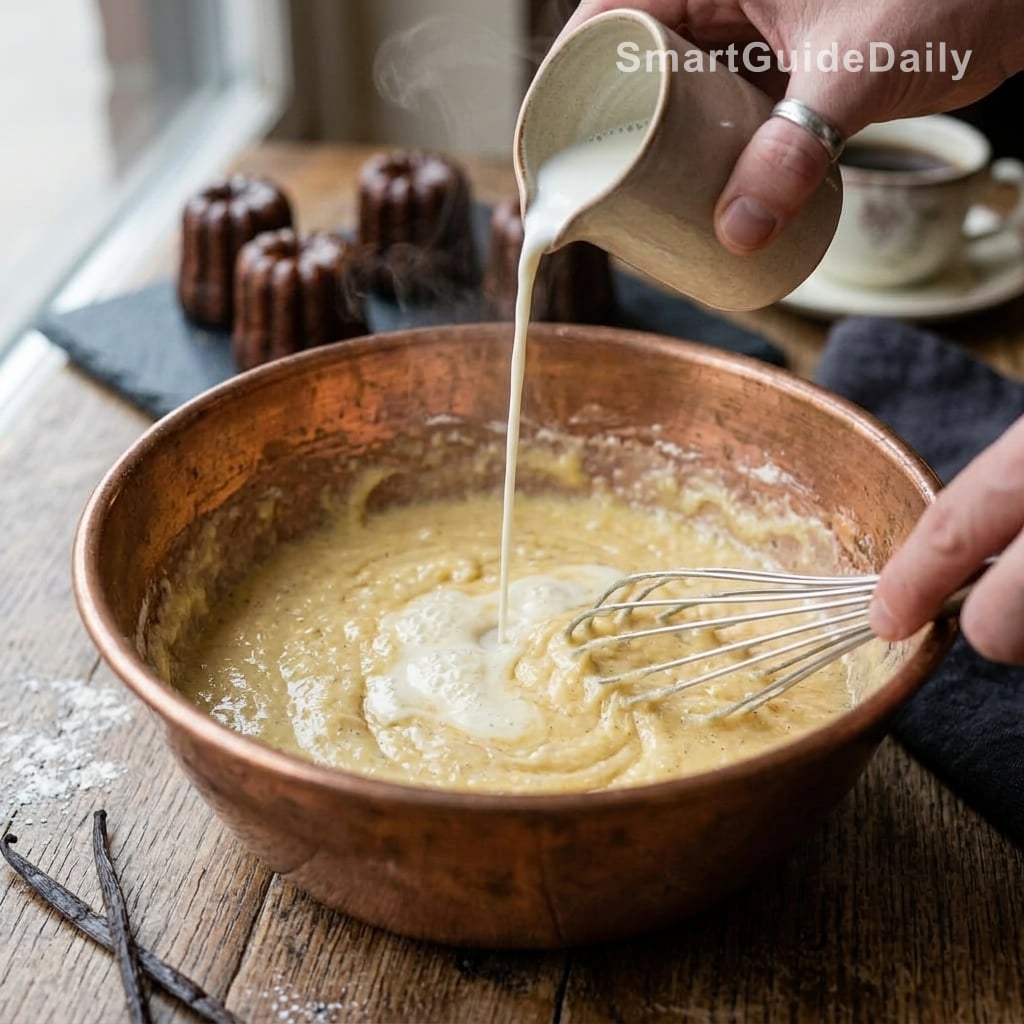
Milk, eggs, vanilla, flour, sugar, butter. The batter is almost too simple for what it eventually produces.
- Whole milk : The primary liquid, making up roughly 70% of the batter by weight. It needs to be whole milk — the fat content affects how the custard sets. Heat it to just below a simmer before combining with the eggs; scalding the milk tempers the eggs and begins starch gelatinization before the oven does any work.
- Unsalted butter : About 10% of the flour weight, used for flavor and for preparing the molds. It plays a structural role in the crust when exposed to high oven heat. Use it cold for the molds — melted butter slides off before it can adhere properly.
- All-purpose flour : At 125g to 500ml of milk, the ratio looks thin. That’s intentional. The batter should be pourable and almost watery — much looser than a pancake batter. Trust it.
- Eggs — whole and yolks : Two whole eggs plus two yolks. The whites provide structure; the yolks provide fat and the custard color. Don’t substitute all yolks — the whites are what allow the center to set without collapsing.
- Vanilla bean : One pod, split and scraped. The bean steeps in the warm milk and infuses throughout the long rest. A dried-out, odorless pod will produce a noticeably flat result — this is where most of the flavor lives.
- Granulated sugar : At 250g to 125g of flour, the sugar-to-flour ratio is 2:1 by weight. This is not a mistake. The high sugar content drives the caramelization on the exterior. Reducing it to make the canelé ‘less sweet’ also reduces the crust. You cannot have one without the other.
Why the Batter Sits Overnight — and Why Most People Don’t Wait Long Enough
The batter for a canelé is not complicated to assemble, but it needs time — more than most recipes admit. The minimum is 24 hours. Forty-eight is better. During that window, the flour hydrates fully, the gluten relaxes, and the vanilla pod steeps properly into every part of the milk. A batter baked at the twelve-hour mark will produce a canelé with a slightly gummy crumb and a muted flavor. The difference is not subtle. The resting period also allows air bubbles to dissipate, which matters for the interior texture — bubbles in the batter become voids in the custard. Cover the bowl tightly, place it at the back of the refrigerator where temperature is most consistent, and leave it alone. The batter should be cold — close to 3–4°C (38–39°F) — when it goes into the molds.
The Part That Fools Everyone: Color Is Your Thermometer
The most common mistake with canelés is pulling them too early. The crust needs to be dark — not golden, not amber, not well-browned. The exterior should reach a deep mahogany, close to what you might otherwise call too dark. At that color, the Maillard reaction and caramelization have proceeded far enough to create the rigid, faintly bitter crust that defines the canelé. Pull them ten minutes too soon and the interior will be fine, but the exterior will go soft within the hour. The contrast disappears. The way to tell: when you lift a canelé from the mold, it should feel noticeably heavier than it looks, and the underside should be uniformly dark with no pale patches. If there are pale patches, it goes back in.
On Molds: What Actually Makes a Difference
Copper molds are the traditional choice, and they do produce a marginally thicker, more uniform crust. Copper conducts heat with more consistency than silicone, and the walls stay hotter throughout the bake. But copper molds are expensive and require beeswax preparation — a process that is straightforward once you’ve done it once, but adds a step. Silicone molds produce a slightly thinner crust and need two to three extra minutes in the oven. The result is structurally the same: dark outside, custardy inside. If you bake canelés more than a few times a year, copper is worth the investment. If you’re making a single batch to understand the recipe, silicone is fine. What is not fine is flexible aluminum foil molds — heat distribution is inconsistent and the crust develops in patches, which defeats the whole exercise.
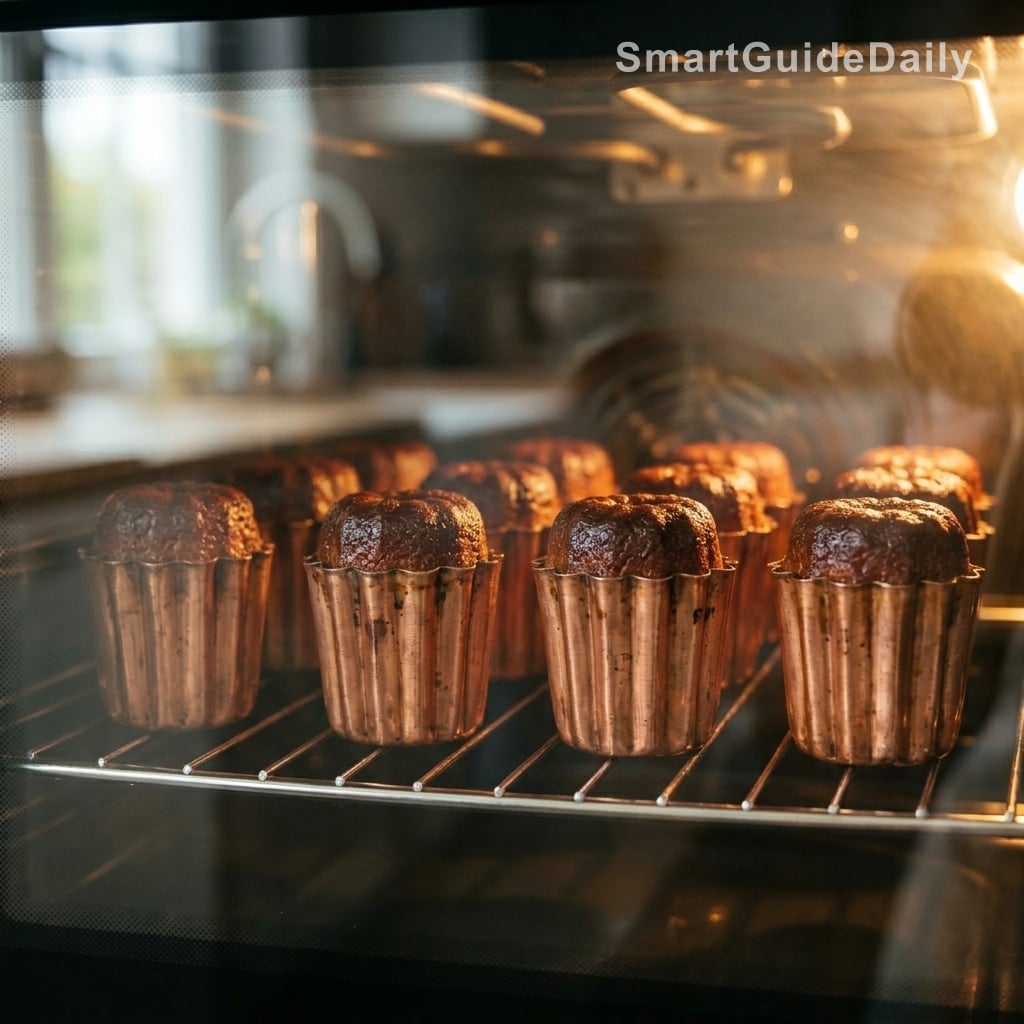
The Oven Sequence: High First, Then Lower, Then Don’t Touch It
The bake starts at 230°C (450°F) for the first 15 minutes. This initial blast of heat drives crust formation — the exterior sets rapidly while the center is still cold from the refrigerator, which delays the custard from overcooking before the crust has time to build. After 15 minutes, drop to 180°C (350°F) and continue for another 55 to 60 minutes. Do not open the oven during the first half. The temperature drop destabilizes the custard, which can cause it to pull away from the mold walls and develop an uneven, pocked interior. Once they come out, unmold immediately. Canelés left sitting in the mold steam themselves soft from the inside. The crust needs air to finish setting — in the mold, it has nowhere to breathe.
Tips & Tricks
- Stir the batter gently before pouring into the molds — do not whisk it. The batter settles during the long rest and needs a light recombination, but whisking adds air. Air becomes bubbles, and bubbles break the custard texture.
- Fill the molds to about 90%, not to the rim. The batter rises slightly in the first minutes of baking, then contracts as the crust sets. Overfilled molds overflow, and the tops bake unevenly.
- Wait at least two hours before eating. The interior is still setting during that time — cut one open at the 30-minute mark and the crumb will be wet and underdone at the center, even if the exterior looks correct.
- If the crust softens by late afternoon, 8 to 10 minutes in a 200°C (390°F) oven brings it back to something close to its original state. Not identical, but close enough to be worth doing.
Can I make canelés without copper molds?
Yes. Silicone molds produce a slightly thinner crust and require two to three additional minutes in the oven, but the result is structurally correct — dark exterior, custardy interior. Copper conducts heat more evenly, which is why it’s the traditional choice, but the difference is marginal enough that silicone is a reasonable substitute for home baking. What doesn’t work is flexible aluminum foil: the heat distribution is too uneven to produce a uniform crust.
Why does my canelé have a wet, gummy center even though the outside looks dark?
This is almost always a batter-rest problem. If the flour hasn’t fully hydrated — meaning the batter rested fewer than 24 hours — starch gelatinization during baking is incomplete, and the center stays dense rather than setting into a proper custard. The fix is straightforward: rest the batter longer. Forty-eight hours produces a noticeably cleaner interior texture than twenty-four.
Why is the sugar-to-flour ratio so high?
The 2:1 ratio of sugar to flour by weight is what produces the caramelized, lacquered exterior. The high sugar content drives both caramelization and the Maillard reaction at the crust surface during the initial high-heat phase of baking. It works because the exterior caramelizes rapidly while the interior — still cold from the refrigerator — sets more slowly as a custard. Reducing the sugar to lighten the recipe also reduces the crust. The two are directly linked.
Can I bake the batter before the 24-hour rest is up?
You can, but the result will be different enough that it’s worth understanding what you’re losing. A batter baked at twelve hours produces a canelé with a muted flavor and a slightly sticky crumb. The resting period isn’t convention — it’s how the batter works. The gluten needs to relax and the starches need time to fully absorb the liquid before heat is applied.
How long do canelés keep?
At peak quality, canelés are best eaten two to three hours after baking, once the crust has fully set. They hold reasonably well through the remainder of the baking day. By the following morning, the crust softens significantly from ambient moisture — you can restore some of it with 8 to 10 minutes at 200°C (390°F), but they won’t return to their original state.
My canelés stuck to the molds. What went wrong?
With silicone molds, sticking usually means the butter coating was applied too thinly, or the molds weren’t cold enough when the batter went in — warm molds cause the butter to melt and pool rather than adhere evenly. With copper molds, inadequate beeswax preparation is the common cause. In both cases, the prepared molds should go into the freezer for at least 10 minutes before filling.
Canelés de Bordeaux
French
Dessert
A small, cylindrical pastry with a deeply caramelized exterior and a custardy, pale interior. The batter is simple; the result depends almost entirely on temperature management and time.
Ingredients
- 500ml whole milk
- 50g unsalted butter
- 1 vanilla bean, split and scraped
- 1 tsp pure vanilla extract
- 250g granulated sugar
- 125g all-purpose flour
- 2 whole eggs, room temperature
- 2 egg yolks, room temperature
- 1 pinch fine salt
- 30g unsalted butter, softened, for the molds
Instructions
- 1Combine 500ml milk, 50g butter, the vanilla bean and its scraped seeds, and vanilla extract in a saucepan. Heat over medium until the butter melts and the milk just begins to steam — stop before it boils. Remove from heat.
- 2In a large bowl, whisk flour, sugar, and salt together until combined. Add the whole eggs and egg yolks and whisk until the mixture is smooth and pale.
- 3Pour the hot milk mixture slowly into the flour-egg mixture, stirring constantly with a spatula. Use a spatula, not a whisk — you want minimal aeration. Strain through a fine-mesh sieve into a clean container.
- 4Cool to room temperature, then cover tightly and refrigerate for 24 to 48 hours. This step is not optional.
- 5When ready to bake, preheat the oven to 230°C (450°F). Coat the molds generously and evenly with the softened butter. Transfer to the freezer for 10 minutes.
- 6Stir the cold batter gently with a spatula to recombine. Fill the molds to 90% — not to the rim. Set them on a rimmed baking sheet.
- 7Bake at 230°C (450°F) for 15 minutes. Without opening the oven, reduce to 180°C (350°F) and continue baking for 55 to 60 minutes, until the exterior is a deep, uniform mahogany with no pale patches.
- 8Remove from the oven and unmold immediately onto a wire rack. Do not let them cool in the molds. Allow to rest for at least 2 hours before eating.
Notes
• The batter can be prepared up to 72 hours in advance. Flavor and texture improve up to the 48-hour mark, then hold steady.
• For copper molds: replace the butter coating with a beeswax-butter mixture (approximately 50g beeswax to 30g butter, melted together and brushed on while warm). This produces a thicker, more uniform crust.
• The batter should look thin — almost watery compared to most pastry batters. This is correct. Do not adjust the flour.
• If the crust softens by late afternoon, reheat at 200°C (390°F) for 8 to 10 minutes. The result won’t be identical to fresh-baked, but it’s close enough to be worth doing.
Nutrition Facts (per serving, estimated)
| 150 kcalCalories | 3gProtein | 23gCarbs | 5gFat |